Aleen Tan has been powerlifting for 8 years and competitively for 5. From a humble member of The Gym Nation, she has moved on to make numerous achievements in the sport under the guidance of Ronin Strength Co. Aleen has finished her Undergraduate Bachelor’s Honours degree program in Physiotherapy from the University of Sydney. Her research project was dedicated towards women’s preferences for pelvic floor information to advise future awareness strategies. With many more Women’s Health project ideas, she looks to specialise in Women’s Health Physiotherapy and furthering her studies in the near future.
introduction
In this article, let’s look at the strategies you can use to reduce large increases in abdominal pressures during the deadlift – the one lift that most women experience leakage with.
Before we get to the juicy part, let’s understand how our pelvic floor muscles are engaged as well as the pressure changes that occur within the abdomen during a deadlift. It is through understanding this that we can better appreciate and consider suitable strategies.
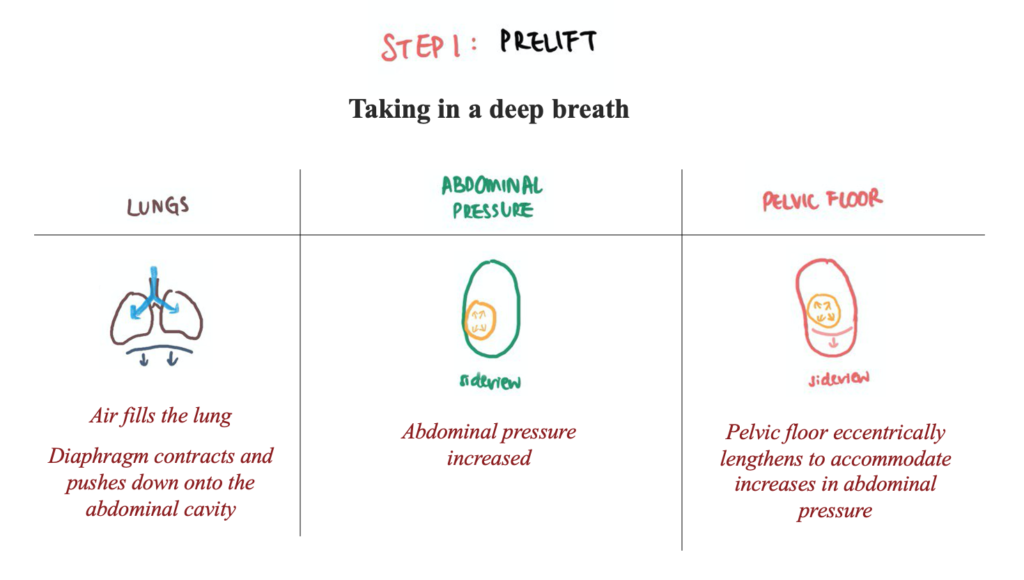
There are many ways in which a big breath is taken in while deadlifting. Some lifters take in a big breath before bending down to pick up the bar, others finish setting themselves up with the bar before taking a big breath in. No matter how you set up the bar, there is still this basic process of a deadlift: Pre-lift, Brace, Ascend and Descend.
This is written in the context where someone is going for heavy reps and sets and would possibly experience leakage during the deadlift. We hope the step-by-step process below helps you relate to your leaking experiences and understand the mechanism behind leaking.
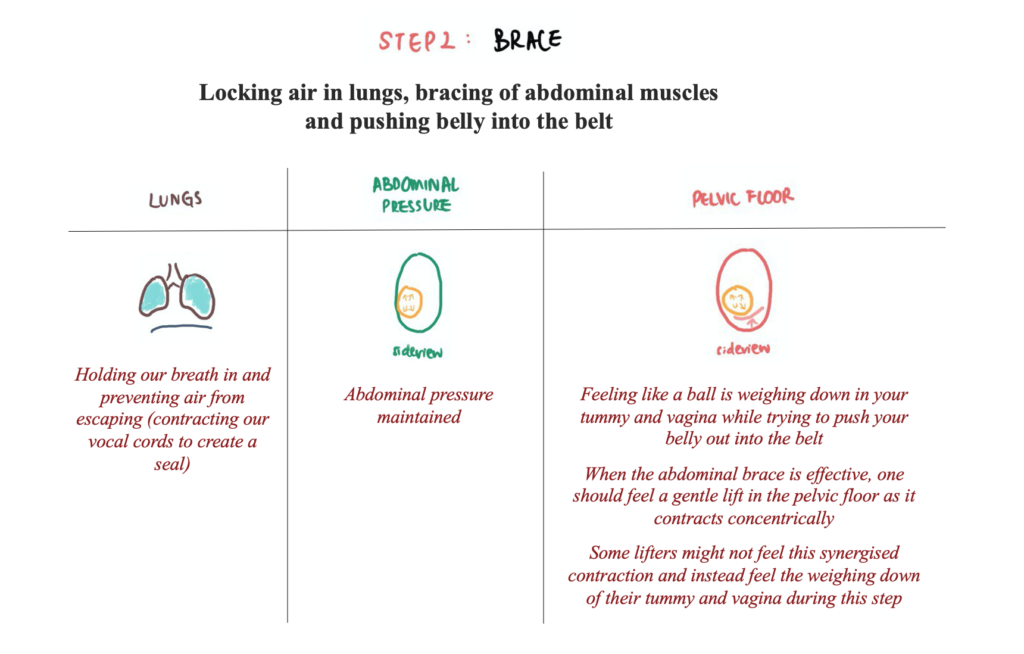
What is happening in Step 2?
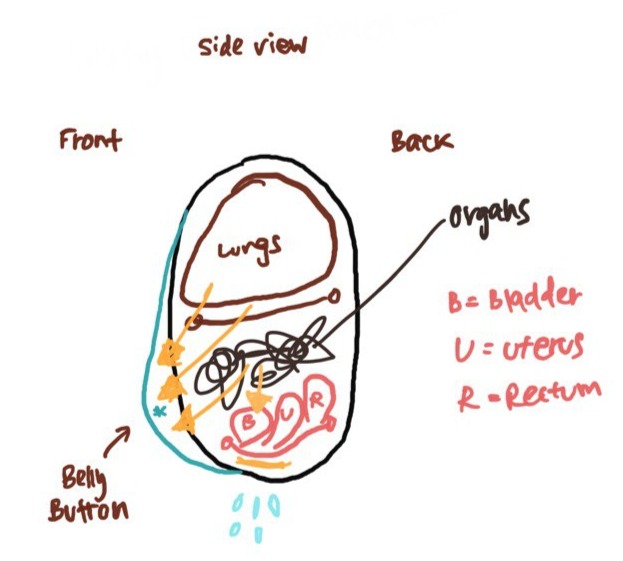
The pressure in your abdomen is being exerted downwards towards the floor
Bearing down onto the pelvic floor and straining i.e. feeling like you are pushing poop out in the toilet after not having eaten enough fibre and too much protein
LEAK!
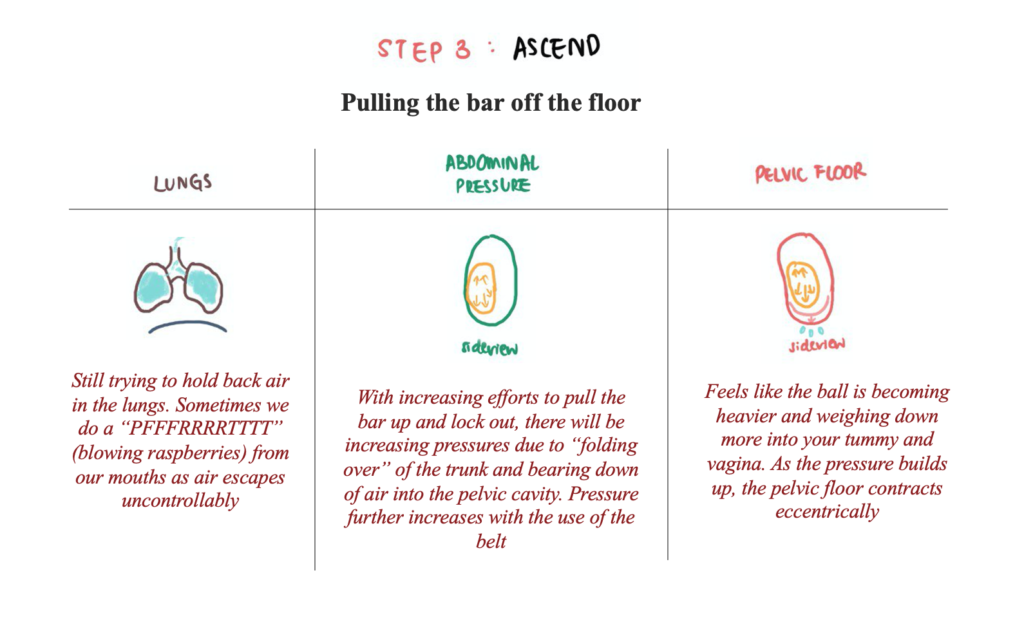
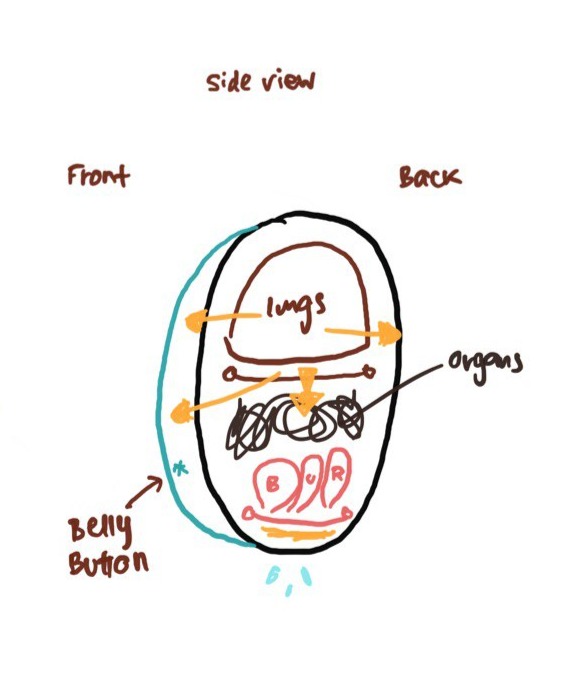
What is happening in Step 3?
1. When leaking occurs, it might be due to pelvic floor fatigue after increased and prolonged pelvic floor engagement.
2. When the pelvic floor is fatigued, it is unable to withstand the pressures exerted on the baldder and the urine leaks.
Finally, we are getting onto the juicy part of this article! After understanding how our pelvic floor muscles are engaged as well as the pressure changes that occur within the abdomen during a deadlift, we hope the strategies below would make sense on how they can reduce leaking.
During the pre-lift, we are often told to adopt mental cues such as:
“lock your air”
“breathe into your belly/belt”
“push air into your belt”
“brace yourself”
1. Adopt new breath cues for your lift
These cues may promote belly breathing whereby we expand our belly to the front, and bear down pressure on our pelvic floor during inhalation. With pressure intentionally exerted and directed on the pelvic floor (a.k.a. straining), belly breathing may increase the chances of leakage as we lift. Optimising our breathing patterns and understanding how to incorporate 360/diaphragmatic breaths into our routine may improve the leaking situation.
Belly breathing and bearing down on the pelvic floor
Some new mental cues you can adopt include:
“breathe deep and wide”
“expand your ribs”
“spread the pressure”
“push into the back of the belt”
One strategy I find works best in achieving the 360 breath is to inhale through the nose or with pursed lips.
360 breathing incorporated
Thick yellow arrow pointing downwards is pointing horizontally towards you
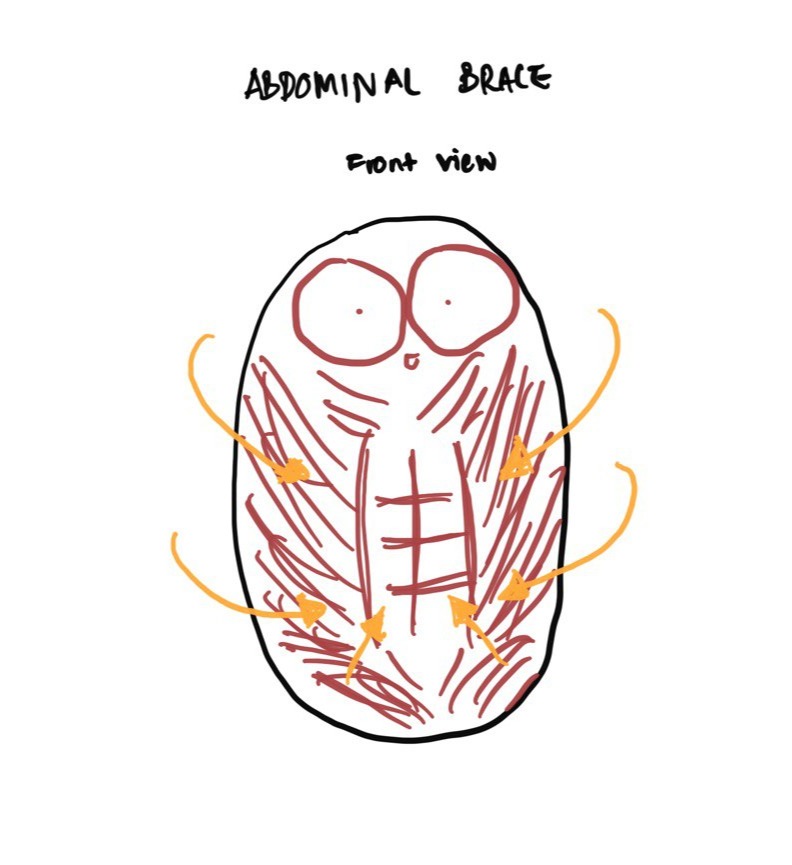
2. learning how to consciously brace your abdominal muscles
Often, in the physiotherapy clinic, Julia finds female powerlifters adopting inefficient ways of abdominal bracing. By “breathing into the belt” and “locking our air”, we are simply trapping/holding air in our lungs and not effectively incorporating the abdominal muscles in the brace we think we are doing.
If you have not been advised on your abdominal bracing before, try this out and see how it feels. Take in a deep breath like you normally would and lock your air in (perhaps even pretending you have a belt around you and just pushing into the belt). After locking in your air, put your palms around your waist at the sides and press into the sides of your waist. If it is spongy and bouncy like a balloon, it shows that you might just be extending your belly and not consciously contracting the deep core muscles the way we want to in a brace.
To brace your abdominal muscles consciously, think of them as something that wraps around your abdominal area from your chesticles down to your hip line. When you brace, the wrapping gets tighter and you should feel the tightness from your back around your waist and down your 6 packs. Now, if you were to press into the sides of your waist again, you should feel that it is hard and stiff.
A potato performing abdominal bracing with arrows indicating how tightening up the abdominal muscles would feel like
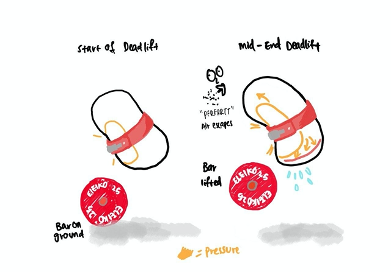
3. understanding when to inhale/exhale during a deadlift and when to contract/relax the pelvic floor
Engage your pelvic floor muscles (squeezing your anus like you are holding in your fart/poop in public) during your abdominal brace before lifting the bar off the ground and hold the contraction until lock out. This voluntary contraction will provide additional support to the increased pressure within the abdomen.
Exhale towards the end of the lockout earlier while still maintaining pelvic floor contraction. This will help to reduce the amount of pressure acting on the pelvic floor in the abdomen.
Do note that we do not recommend using this as the first strategy if you are not familiar with pelvic floor contractions or that you feel pain and discomfort while performing it. You will have to be proficient at contracting the pelvic floor before starting to use this method. In the second article, we talked about performing deadlifts without additional load and contracting the pelvic floor at the same time in warm-ups before training. We recommend that you start with that first for a month or two and see how that goes before incorporating them into your main lifts.
4. going up a notch or reducing the thickness of the belt
When the belt is too tight, first, it stops you from being able to take a deep 360 breath. Secondly, your abdomen is further squashed as your deadlift form breaks down at higher weights.
A corset-like band around our waist only allows a shallow 360 breath for an abdominal brace. This makes it difficult to achieve the tension we need for the lift and as a result our form breaks down faster. This then results in the latter situation where, as our form breaks down and we bend forward more during a deadlift, there is increased pressure exerting on the pelvic floor. With a tight belt in place, we further increase this pressure acting on the pelvic floor (imagine a balloon being squashed sideways, the balloon conforms and expands vertically above and below).
‘Balloon’ being squashed sideways and expands vertically above and below
When the belt is too thick and stiff, this makes it hard to break into/season the belt. As a result, a stiff belt makes it hard to take in deep 360 breaths and less spatial allowance/ compliance to pressure changes in the abdomen as we lift. If you have a choice, opt for the 10mm belt!
5. use the belt only when you really need it
It has been discussed earlier that using a belt further increases the pressure within your abdomen as you lift hence it would be logical to reduce this immense pressure being put on the pelvic floor that further strains/overwork it as a method to reduce leakage.
For elite athletes working at very high intensities, you can use this method as best as you can but for beginners who are just starting out, I advise you not to rush into getting a belt before having properly built on your base strengths. The belt should be viewed as a supplemental item for you to lift weights, and not as an essential tool. The ability to achieve adequate 360 breathing and tension, abdominal brace, pelvic floor contraction and posterior strength should be the priority before the routine implementation of a belt.
Tell us some of the things you have done that you find helpful in reducing leakage while training or some things that we may have left out. It may be helpful for others too! Feel free to drop a message/comment to get in touch with me here!
disclaimers
The strategies suggested here can be used to potentially reduce the occurrences of leaking in your next training session. They are not exhaustive and there are more factors that can contribute to your leaking problems such as non-optimal lifting techniques and training methods (frequency, intensity, volume). We will look into those and discuss them in the next article of this series.
Again, it is important to understand that not all methods listed here are to be added into your routine and that the methods you should be using are dependent on your individual condition. It is highly recommended that you approach a women’s physiotherapist to assist you in selecting the best method. The purpose behind each method is described and whichever method you’d like to try out on your own is up to your discretion.
All illustrations here are not drawn to scientific scales and measurements. They are drawn to exaggerate the explanations in a manner that we hope readers can relate to while performing the activities.
acknowledgements
We would like to thank Julia Hlaing (a.k.a @pelvicstrong on Instagram) for her input in this article. She is a women’s health and musculoskeletal physiotherapist from Sydney, Australia with a focus on pelvic related conditions amongst athletic females. She is also very competitive in an array of different sports from powerlifting to bikini modelling, having won the 2016 and 2018 ANB Swimsuit Pro. It is our pleasure to have Julia contribute to this article series to help women in powerlifting.